Organic Groups for Drupal 6
Organic Groups (OG) is the social networking solution for Drupal. It forms the basis of http://groups.drupal.org and also powers Drupal Commons, the widely used social networking distribution.
OG allows users to create and manage their own groups. Other members can then join those groups and share content either privately or publicly.
Two notes of caution before we start:
- OG is a powerful solution but not for the faint of heart. To use it, you will need a good understanding of Drupal, plus Views and Panels as well.
- There are some major differences between the Drupal 6 version and the new Drupal version.
Here’s an introduction to OG for Drupal 6. Click here for our tutorial on Organic Groups for Drupal 7.
Step 1: Install the Modules
You’ll need to download and install this module of course:
- Organic Groups: http://drupal.org/project/og
OG will work without them but to really make use of OG you’ll certainly need these modules too:
- Views: http://drupal.org/project/views
- Panels: http://drupal.org/project/panels
- Chaos tool suite: http://drupal.org/project/ctools
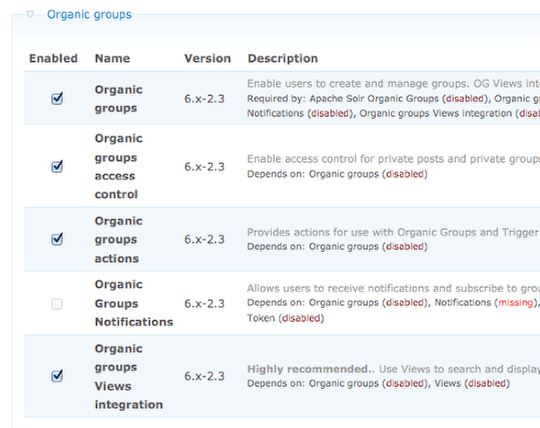
When you visit the modules page to enable modules, make sure to enable all of the Organic group submodules.

After enabling the modules, you’ll see a message saying “The content access permissions need to be rebuilt.” Click “this page” and follow through the steps until the process is finished.

Step 2: Creating Groups
Here’s the key thing to understand about Organic Groups: they are entirely based on Drupal’s nodes.
The groups themselves are nodes and the content shared inside the groups are nodes. When you set up a new content type, you can decide whether nodes in that content type become groups or content within groups.
- Go to Administer > Content management > Add content type.
- Create a content type called Groups.

- Check the box which says: Group node. This means that these nodes will form the basis for the groups on our site.

- Go back to Content management > Add content type.
- Set up a content type called Group News.
- This time we’ll check the box which says: Standard group post.

- Go to Create content > Groups and create a new group.
- By default all groups are Open for any registered member to join, but as you can see, private groups are also possible.

- Go to Create content > Group News and create a new announcement for your group.
- Make sure to check your group under the Audience heading.

- When you publish your content it will look just like a normal node, only with a link to the group at the bottom:

- When you click the group name, even the group itself will look like a normal node.

- At this point you can actually use Organic Groups. It won’t look great but it will work.
- You can go Administer > Organic groups and configure how OG works on your site.

However, to really use OG, you’ll need to make use of Views and Panels.
Step 3: Organic Groups and Views
- Go to Site building > Views. You’ll see large number of Views already created for you. These will do things such as show a list of your groups:

- And a list of posts in the groups you are a member of:

Because OG is integrated with Views, you use Views to setup a lot of the key landing pages for your social network.
Step 4: Organic Groups and Panels
If you want to control the layout of your page, you will need Panel.
- Go to Administer > Site building > Panels.
- Click Note template.

- Node type: Groups.
- Layout: Choose the layout you want for your Groups pages.

- Skip the next page.
- You’ll be on the main Panels design page. Click the cog next to each region of the content to place the items you’d like on your main groups page.

- Click Finish.
- Make sure to click both “Enable” and “Update and Save” to finish and make the Panel live on your site.
What’s Next?
From this point onwards, there is still a lot of work to do in order to create a social site, but hopefully the principles are now clear. The process of getting OG setup is Content > Views > Panels.
Thanks for this tutorial. This is very useful. I can’t find the link to the Organic Group Views Integration Module on the [url=http://Drupal.org]Drupal.org[/url] site. I’m using 6.x-2.4.