Dropdown Menus in Drupal 8 with the Superfish Module

If you want to build a large, multi-level drop-down menu in Drupal 8, then the Superfish module is a great choice.
The Superfish module makes use of the jQuery Superfish menu plugin, which is useful for multi-level drop-down menus. Superfish has more features than most dropdown menus. It supports touch devices and keyboard interaction.
In this tutorial, we’re going to create a menu for a sports news site with three menu levels.

Step #1. Install the module and libraries
First, let’s install the module:
- Download and enable the Superfish module for Drupal 8
Now, let’s install the libraries:
- Download the Superfish library 2.x for Drupal 8.x.
- Uncompress it to your [DRUPAL_ROOT]/libraries directory. If you don’t have the libraries directory yet, please create it
- Download the jQuery Easing plugin (optional but recommended)
- Uncompress it too to your [DRUPAL_ROOT]/libraries directory.
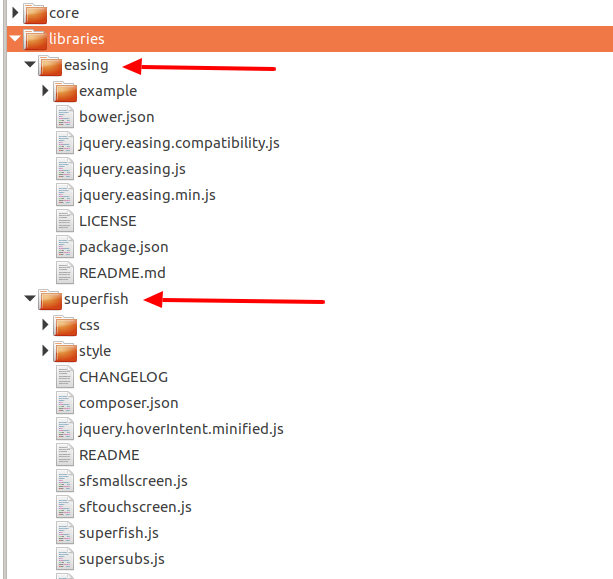
- Rename both directories, so that you have the following file/folder structure:

Step #2. Create the menu structure
- Go to Structure > Menus.
- Click the Add menu button:

- Enter the menu title and click the Save button:

Step #3. Add the menu links
- Once the menu has been added, click the Add link button to create the menu links:

- Create the menu links according to the predefined structure. Notice that you have to link each menu item to a piece of content.
- Click on the Show as expanded checkbox, so that the menu will appear expanded if it has children.
- Click the Save button each time you create a menu item.

Once you have created all the links:
- Use the handles to drag and drop the items in order to match the menu structure
- Click Save:

Step #4. Place the menu
Menus in Drupal 8 are rendered as block entities.
- Click Structure > Block layout.
- Search the Primary menu region and disable the Main navigation default block.
- Click the Place block button.

- Enter the name of your menu in the search box. You will find two “News site” menus.
- Click the Place block button on the line with the Supefish category.

Step #5. Finalize the Superfish configuration
- Uncheck the Display title checkbox:

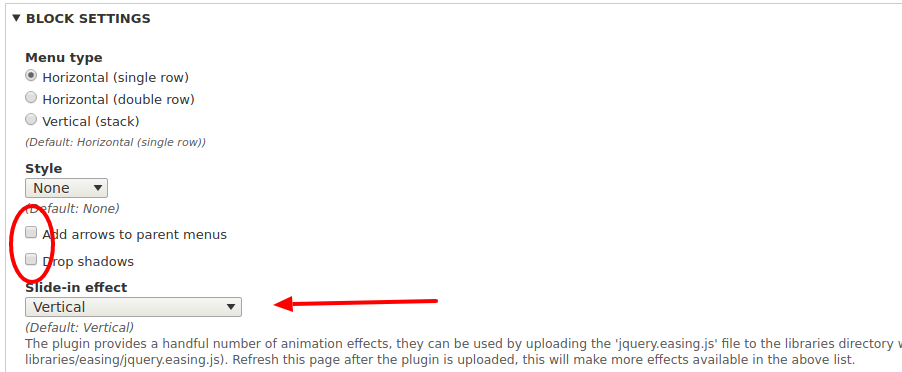
There are several configuration options in this window. Particular attention deserves the Slide-in effect provided by the jQuery Easing plugin (which you downloaded at the beginning) and the ADVANCED SETTINGS where you can configure for instance the animation speed. Play with this options until you find the ones to your liking.


- Click Save block and go to your homepage. You will have a multi-level drop-down menu now!
You have to tweak it with your own CSS, but the main menu functionality is there:

I hope you enjoyed reading this tutorial and making your own Superfish menu. Please leave your comments below.

Congratulaciones, Jorge!
Excellent article!
Hello Heinz. Thank you very much for your feedback.
Great Article Buddy!! Thank you very much
Hi there Jorge!
This looks good but I cannot get the Superfish menu to work in the new Drupal 9.0 version.
I cannot get the menutree to expand when I hoover or click.
Hi Sven,
I did this tutorial this morning (6/8/2020) and it worked fine. I even left all the defaults selected. It’s not pretty – but it worked (on hover). I’m using Safari on a mac.
If you want to follow up – post some images of your set up and let’s see what we can do.
thanks!
Rod
Thanks for the article. It worked up to a point but, when installing the block, the block settings and advanced settings option were not there 🙁
(using Drupal 8.9.2)