How to Integrate a Sliding Menu in Your Drupal 8 Site

The Sidr module for Drupal 8 allows site builders and themers to add one or more sliding menus to their sites in a very uncomplicated way. It makes use of the open-source Sidr jQuery library. Keep reading if you want to learn this useful module!
Keep reading to learn how!
Step # 1.- Install the Required Modules
- Open the terminal application of your system.
- Place the cursor at the root directory of your Drupal installation (the composer.json file is there).
- Type: composer require drupal/sidr

This will download the module from its project page on Drupal.org and place it inside the /modules/contrib folder.
We need to download the JS library from its project page as well.
- Download and uncompress the file.
- Create a libraries directory in the root of your Drupal installation, in case that there is no one available.
- Create a directory inside libraries called sidr.
- Copy the whole content of the dist folder (inside the uncompressed file) into the sidr directory.


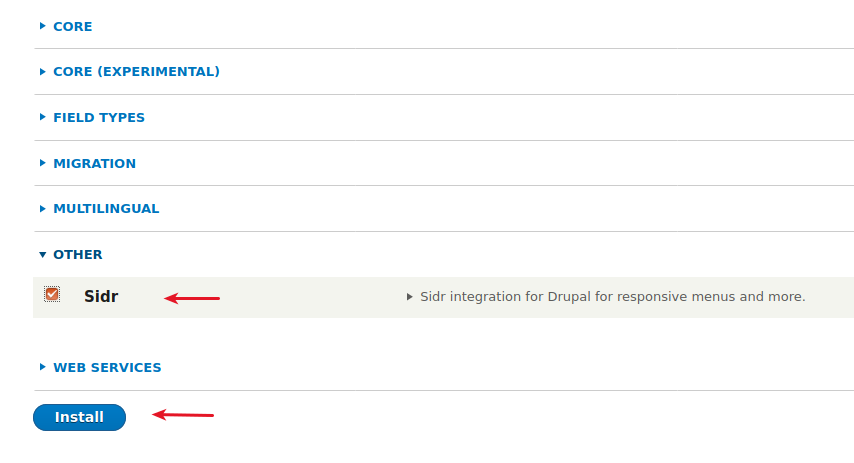
- Click Extend.
- Enable Sidr.
- Click Install.

Step #2. – Create a Custom Region
I am assuming that you already know how to create a subtheme. If you do not know about subthemes yet, take a look at this tutorial and then come back here.
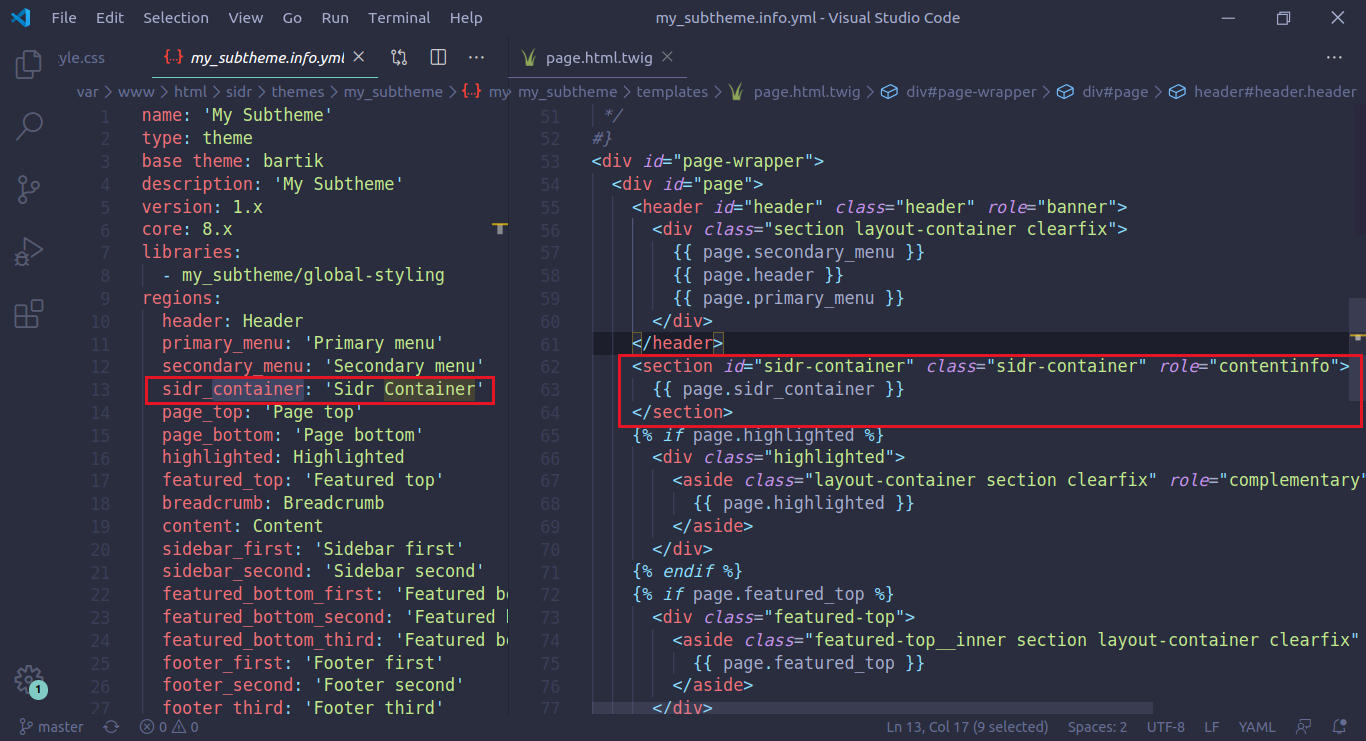
- Open mysubtheme.info.yml
- Create a custom region called sidr_container.
- Open page.html.twig and include the region you created before in this template.
- Save all files.

- Click Configuration > Performance > Clear all caches.
Step #3. – Place the Trigger Button
The module provides a block. This block triggers the hidden “sidr” container, so you can open or close the menu. First, we need to hide the region we declared in Step #2 with CSS.
- Open the stylesheet of your theme.
- Copy and Paste this code:
#sidr-container {
    display: none;
}
- Click Structure > Block layout.
- Click Place block in the Header region.
- Locate the Sidr trigger button block.
- Click Place block.
The Sidr options will be displayed in a modal window.
- Uncheck Display title.
- Enter a proper label for the trigger text.
- Add the region you want to display inside the Sidr container.
- Change the menu location to Right.
- Click Save block.

- Scroll down and click Save blocks.
- Locate the Sidr Container region.
- Click Place block.
- Search for the Main navigation.
- Click Display block.
- Uncheck Display title.
- Click Save block.
- Scroll down and Click Save blocks.

Make sure that you use the right CSS selector (‘#’ if you are using the element id or ‘.’ if you are using its class instead). As you can see, you can make use of all Drupal blocks within the Sidr Container. Notice also that you are using 2 instances of the same menu block within 2 different regions of your site.
Let’s add the logo image:
- Click Appearance and edit the settings of your theme.
- Upload a logo image.
- Click Save configuration.
- Click Block layout.
- Remove the Site Branding block from the Header region.
- Add the Site branding block to the Sidr region.
- Scroll down and click Save blocks.

You can enhance the look and feel of your sliding menu with CSS code.
I hope you liked this tutorial, thanks for reading.
Check out my other blog on How to Create a Bartik Sub-Theme.

Cool! Thanks for the detailed instructions. As the moule author, I noticed that the instructions are more for the 2.x branch of the module.
The 3.x branch allowed installing libraries using composer and the installation instructions are different.